My task this morning is to finally record my favorite craft shows on DVR to the DVD. I've had some these shows on DVR for over a year and I've been after my dear guy to please hook up the DVD recorder so I can get these wonderful shows recorded. We've been having problems with the DVR and I was afraid I was going to lose them. It's happened before and I didn't want it to happen again. It's not that I'm a technophobe, I can usually do it myself but this set up is way more complicated than I wanted to mess around with when my guy could do it in minutes. He put it together so he knew the whole wiring setup and it would have taken me hours to figure out. (I like to do it from the start or not at all) Although thinking about it now, I should have figured it out and I wouldn't be sitting here now recording hours and hours worth of shows. The bright side of this is that I have some new inspirations...or should I say old inspirations renewed.
Thanks to HGTV's B/Original program, my renewed inspiration came this morning in the form of wall art. Yes, there are many, many styles of wall art but this morning I fell back in love with words written directly on the wall. What?
Here's what you do: think up some great words, write them out on paper very large, or print them out on your computer if you don't like your handwriting. Then trace the words on the wall using graphite pencil, outline only. Host, Michele Beschen, says regular carbon paper will bleed on the wall. I'll talk about that more later. Then using acrylic caulk fill in the letters. It's like frosting a cake, except you can't eat this frosting (damn, I love frosting). After it's dry you'll primer it and paint. You can paint using the same color to create a very subtle look or use a different color to make it stand out.
So after recording for a few hours, My Guy comes to me and says he's going to Home Depot, do I want to go? Ah, do I ever say no to the hardware store? No. I love the hardware store. So when we got everything he went there to get and he says 'what do you want to look at?' Calking and copper was my response. Caulking for my renewed inspiration project and copper just because I love copper and I want to fondle it. :) First up, white acrylic caulk. I didn't know how much to buy but My Guy says buy as many as you want because I can always use what you don't. So I picked up three tubes, which turned out to be two too many. By the way, no specific brand is required so I choose the cheapest.
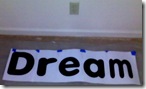 I came home and printed out the word Dream. That's a good word for a bedroom isn't it? I tried using a word processing program but I found the 72 point letters didn't come close to what I needed. The word Dream in 72 points, the largest point size available for the font I wanted, was only 5 inches wide. I'd need a magnifying glass for that so I used my scrapbook software to create large letters. The D was the largest at 8" tall and about 5' wide. I taped it all together and went to look for some tracing paper. The picture shows the scale of the word as compared to the wall plug in.
 Now I know I said Michele said to use Graphite paper but I didn't have any and the nearest art store is 25 miles away so I used my carbon paper. I found a few sheets of red carbon paper from my home sewing days (ages ago.) and laser level to make sure it goes up straight. I taped the Dream letters to the wall using blue painters tape so I don't mess up the existing paint. OK so now it's time to trace the letters. Place the carbon paper behind the printed sheets so that the letter has carbon all the way around it. Using a pen, pencil or stylus, trace the outline of the letter. Press hard because you are going through two, sometimes three layers of paper.
Time to fill in the letters with caulk. I used a caulk gun to make it go quickly and worked for about an hour. At the end of that hour it looked like this:
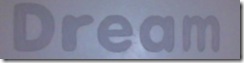
At this point it's dull but I'll go over it with primer and then with regular paint, then the letters will be highlighted with a pearlescent white paint. I'm happy with how it's turning out. I'll post pictures of the finished product later.


